This article contains affiliate links. Learn more in our affiliate disclosure.
Madeira surprised us more than almost any other island we’ve hiked on. Before visiting, we knew it was green and mountainous, but we didn’t expect just how diverse the hiking here would be — from ridge walks high above the clouds to narrow levadas carved into cliffs, quiet forest trails, and wild coastal paths.
We explored Madeira with hiking as a main focus, but also with a very different setup than in the past — we were travelling with our three-month-old daughter, Ema. That forced us to slow down, choose our hikes more carefully, and really think about conditions, timing, and safety.

In the end, it gave us a more honest picture of what these trails are actually like, not just at sunrise with perfect weather, but in real-world situations.
This list is based entirely on our own experience on the island. Some hikes we completed fully, some only partially, and a few we decided to skip altogether because of wind, weather, or logistics — and we’re sharing those decisions openly.
We’ve included famous trails as well as quieter ones, with practical notes on what we loved, what surprised us, and who each hike is really best for.
If you’re planning to hike in Madeira and want clear, first-hand advice rather than a generic checklist, these are the trails we think are truly worth knowing about.

In a hurry?
These are our top hotels in Madeira we’d book again
⭐️⭐️⭐️ Hotel Porto Mare – PortoBay (our top pick) – Elegant oceanfront resort in Funchal with tropical gardens, multiple pools, and warm service.
👉 See prices & availability →
⭐️⭐️ Aqua Natura Bay – Boutique-style stay in Porto Moniz with an infinity pool, panoramic Atlantic views, and direct access to the natural lava pools.
👉 See prices & availability →
⭐️ Quinta das Vinhas – Charming mid-range stay in Calheta surrounded by vineyards and mountain views, perfect for a peaceful countryside escape.
👉 See prices & availability →
Best hikes in Madeira
1. Pico do Arieiro to Pico Ruivo (PR1)
Distance: 8.3 km
Duration: 5 hours
Difficulty: difficult
Why This Hike Is Worth It
This hike was one of the most powerful experiences we had in Madeira, even with parts of the trail closed during our visit. Instead of going for sunrise, we decided to hike it at sunset, mainly to avoid the crowds — and it turned out to be one of our best decisions.
Once we passed the initial viewpoints, we had the ridge almost entirely to ourselves, meeting only a handful of other hikers. Walking along the mountains as the light softened and the peaks slowly changed colour felt incredibly special. The views from Ninho da Manta viewpoint were a clear highlight for us and alone made the effort worth it.

Trail Overview: What to Expect
From the first steps, this trail stays high and exposed, following the volcanic ridge up and down through Madeira’s central mountains. We were constantly climbing and descending stone staircases, with safety railings installed in the most exposed sections.
Even with the railings, we felt how important it is to stay strictly on the marked trail. The volcanic rock here is unstable, and stepping off the path can be dangerous — a fall in some sections would have serious consequences.

What we loved most was how raw and dramatic the landscape felt the entire time, with clouds rolling in and out and views changing every few minutes.
Currently, you can only hike for around 20 minutes before the trail closure.
Read our full guide to the Pico do Arieiro hike — with current trail closures, safety tips, parking details, and our exact timing strategy.
Important Update (2026)
When we did this hike, only a short section was open due to the 2024 wildfires. The trail is currently closed shortly after the Stairway to Heaven, which means the full route to Pico Ruivo isn’t accessible until at least April 2026.
Even so, we still found it absolutely worth doing for the scenery and atmosphere — just go in knowing you won’t be completing the entire crossing for now.

Getting There, Parking & Fees
We drove up to Pico do Arieiro and parked right at the trailhead. There are actually two car parks here. The main one sits directly at the start of the hike and fills up fast, especially earlier in the day.
If it’s full, there’s a second car park slightly lower down, which is a great alternative — it’s cheaper and there’s a shuttle bus running between the two. This made parking much less stressful and is worth knowing about in advance.
There are toilets and a café at the upper car park. Under normal conditions, the trail continues all the way to Pico Ruivo, where hikers either return the same way or continue to Achada do Teixeira if transport is arranged — something we’d love to do once the full trail reopens.

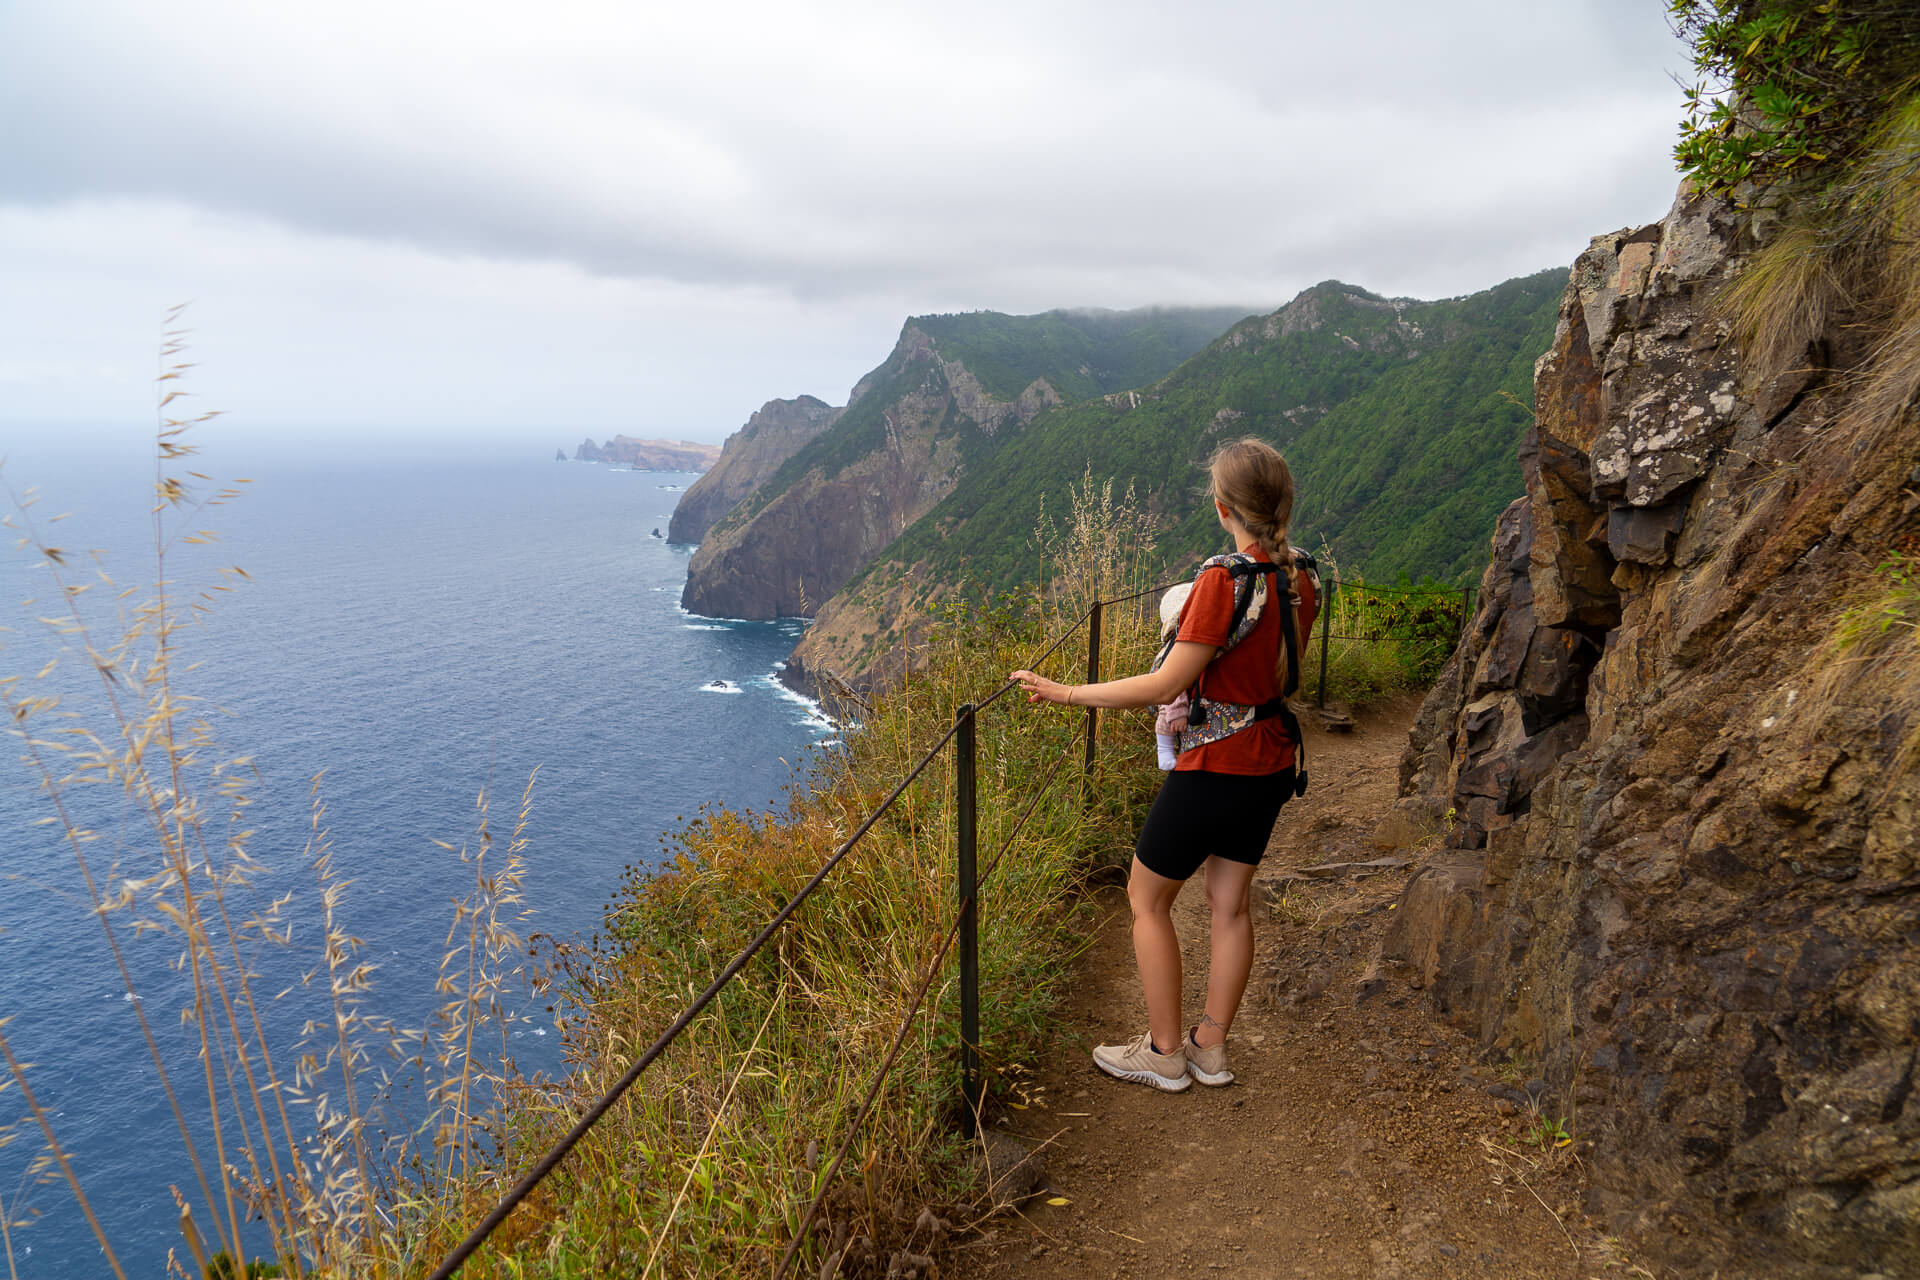
2. Vereda do Larano
Distance: 5.3 km one-way (10.6 km round trip)
Duration: 6 hours
Difficulty: medium
Why This Hike Is Worth It
This ended up being one of our favourite coastal hikes in Madeira — mainly because of how quiet and untouched it felt. We only met four other people the entire time, which is rare on the island.
What we loved most was the contrast: calm walking at the start, then suddenly stepping into wide-open coastal scenery with waves crashing violently below. We didn’t even need to finish the full route to feel satisfied — the most spectacular section came surprisingly early and completely exceeded our expectations.

Trail Overview: What to Expect
The trail follows the coastline along the side of a mountain, constantly opening and closing between forested sections and exposed coastal views. The first part felt very relaxed for us, following a wide, easy path, with only a few narrower sections once you enter the forest.
After about an hour, the landscape changes dramatically — the forest opens up and the trail runs along an exposed cliffside with uninterrupted views of the Atlantic. This was easily our favourite stretch. From here, you can see waves smashing into the coast below and, in the distance, the peninsula where the Ponta de São Lourenço hike is located.
The path is slightly exposed but protected with safety railings, so it never felt dangerous to us, though it can definitely feel uncomfortable if you’re afraid of heights.
We turned back earlier than planned because it was very windy and we were hiking with Ema, who was just three months old at the time — and even then, the hike felt completely worth it.

Getting There, Parking & Fees
There’s no official car park for Vereda do Larano. We parked along a small road in the village where locals live and where a few farms are located. Parking is free, but spaces are limited, so arriving earlier helps.
It’s important to know that there are no facilities at all along the trail — no toilets, cafés, or water — so come prepared before you start.


Our Madeira Google Maps
Built from our real trips around Madeira — only places we actually visited and loved.
No random saves. No wasted time. Just a ready-to-use map that helps you explore the island in a way that actually makes sense.
92 handpicked spots, including:
📍 The best attractions & unique places
🥾 Our favorite hikes & scenic viewpoints
🍜 Restaurants and cafés we’d go back to
🚠Scenic cable cars
3. Levada das 25 Fontes (PR6)
Distance: 4.3 km one-way (8.6 km round trip)
Duration: 3 hours
Difficulty: medium
Why This Hike Is Worth It
For us, this hike was all about experiencing Madeira’s levadas at their most atmospheric. Once we chose the right timing and avoided peak crowds, we finally understood why this trail is so well known.

Walking side by side with flowing water almost the entire way, completely surrounded by forest, felt calming in a way we didn’t expect from such a popular route. What really made the effort worthwhile for us was the ending — arriving at the 25 Fontes waterfall, where several streams spill into a small pool hidden in the forest. Standing there, watching the water and soaking in the quiet, felt like a genuine reward.
This hike really showed us that even Madeira’s busiest trails can be special if you experience them at the right moment.

Trail Overview: What to Expect
The trail follows a narrow levada through dense forest, with very few wide-open views but we didn’t miss them at all. We were surprised by just how green everything felt, especially with the twisted laurel trees lining the path and creating a slightly magical, almost fairytale atmosphere.
Even though levada walks are often described as easy, this one definitely made us work — there are many stair sections and the trail constantly goes up and down, which made it more tiring than we expected.

The path is well maintained but quite narrow in places, so when it’s busy, it can feel cramped. In the afternoon, though, it felt calm and peaceful, letting us really enjoy the forest around us.
Read our full guide to Levada das 25 Fontes (PR6) — including the best time of day to avoid crowds and how to shorten the hike.
Getting There, Parking & Fees
The hike starts in the Rabaçal area, where there’s a large free parking lot, but it’s very often full, especially late morning and around midday. We quickly realised that parking can be the most frustrating part of this hike if you arrive at the wrong time.

To shorten the route, it’s also possible to use a car transfer along the first asphalt section down to Rabaçal Nature Spot Café. If you’re only planning to use the transfer one way, we’d strongly recommend doing it after the hike, as the road back up from the café is uphill.
The café is also the only place with basic facilities and food, so it’s worth stopping there before or after the hike, as there’s nothing once you’re on the trail itself. We highly recommend their Pavlova cake!
If you don’t plan to rent a car in Madeira, we recommend booking this Levada das 25 Fontes transfer for the hike.

4. Levada do Moinho + Levada Nova (PR7)
Distance: 10.5 km
Duration: 3.5 hours
Difficulty: medium
Why This Hike Is Worth It
We loved this hike mainly because it’s a loop, so you’re not retracing your steps — the scenery keeps changing the entire way. It also felt far more adventurous than we expected. Even though we’d read that parts of the trail are exposed, we were still surprised by how narrow some sections were.

Walking with water flowing along one side of the levada and a steep valley dropping away on the other definitely kept us focused. Add in distant ocean views and a spectacular finale, and this hike quickly became one of our favourites.
The absolute highlight comes near the end, where a waterfall crashes directly over the trail and you walk behind it — easily one of the most memorable moments we had on any levada hike. Right after that, the route continues through a long, dark tunnel, which added another adventurous touch to the loop.

Trail Overview: What to Expect
After a short uphill walk to reach the trail, we quickly found ourselves walking alongside the levada with open views over Madeira’s terraced hills and distant ocean. This first section felt relaxed and scenic, with the water flowing quietly beside us and the landscape opening up almost immediately.
As the trail continues, it moves in and out of forested sections, where the atmosphere becomes more enclosed and calm. We passed a small river crossing and a couple of natural rest spots that felt like good places to pause without breaking the rhythm of the hike. Later on, the route climbs up to Levada Nova, where the scenery opens up again and the trail becomes more dramatic.

The final part of the hike is where everything comes together — a mix of waterfalls, tunnels, and exposed sections with wide valley views. Some parts here are narrow and require attention, especially if you’re not comfortable with heights, but the variety and changing scenery kept the hike engaging until the very end.
Read our full guide to Levada do Moinho + Levada Nova — covering the loop route, exposed sections, and the waterfall you walk behind.

Getting There, Parking & Fees
The hike starts in a small village above Ponta do Sol. There’s no official parking area, so cars are parked along the main road through the village. Parking is free, but there are only a handful of spaces, so arriving early is important.
We didn’t have any issues finding a spot, but later in the day it can get tight. There are no facilities at all along the trail, so make sure you bring enough water and anything else you’ll need before starting.
If you need a transfer to get to the hike’s starting point, we recommend booking this well-reviewed Levada do Moinho transfer on GetYourGuide.

5. Vereda do Chão dos Louros (PR22)
Distance: 1.9 km
Duration: 45 minutes
Difficulty: easy
Why This Hike Is Worth It
For us, this hike felt like a slow, peaceful break from Madeira’s more intense trails. We didn’t come here for dramatic views, and that actually made the experience better.
Starting at a higher mountain pass, we walked straight into mist and low clouds, which instantly set a calm, almost moody atmosphere. We were enjoying the quiet and the feeling of being deep inside the forest.
It’s not a must-do hike if time is tight, but if you have a free half day and want something gentle and grounding, we really enjoyed this one.

Trail Overview: What to Expect
The trail is a short loop that gently rises and falls through dense laurisilva forest, and it never felt steep or demanding for us. It’s more of a relaxed forest walk than a proper hike, and we appreciated how easy it was on the legs.
That said, the start can be confusing — we actually took the wrong trail at first and had to turn back slightly, so paying attention to signs early on is important. For most of the walk, you’re fully surrounded by trees, but at one point the forest opens up and gives you a surprisingly beautiful view down the valley toward the ocean and São Vicente.

Getting There, Parking & Fees
The hike starts at a mountain pass inside a nature park, which also works as a camping area and is genuinely a beautiful place on its own. We arrived by car and parked in the small parking area at the trailhead.
It’s not big, but we had no trouble finding a spot, and parking is free. There are no facilities on the trail, so we made sure to bring water and snacks with us before starting.

6. Vereda da Ponta de São Lourenço (PR8)
Distance: 3 km one-way (6 km round-trip)
Duration: 2.5 hours
Difficulty: medium
Why This Hike Is Worth It
Even though we didn’t end up hiking this trail, it still deserves a place on this list. We came here fully intending to do it, but the wind was extremely strong that day and we were carrying Ema, who was just three months old, so we decided not to risk it.
Standing at the trailhead, it was obvious this hike is all about raw, exposed coastal scenery. The landscape is completely different from the rest of Madeira — dry, volcanic, and almost desert-like — and from what we saw, the views along the peninsula are wide open and dramatic the entire way.
On a calmer day, this is clearly one of the island’s most unique hikes. But as it’s a peninsula, it is often windy.
Trail Overview: What to Expect
The trail follows the narrow São Lourenço peninsula, stretching out into the Atlantic with ocean on both sides almost the entire time. There’s very little shade, no forest cover, and nowhere to hide from the elements, which makes wind and sun a big factor here.
From our short walk near the start, we could already feel how exposed the route is, and it was easy to imagine how demanding it could be in strong wind or heat. The terrain is mostly dirt paths and rocky sections with constant gentle ups and downs rather than steep climbs.
This hike is known for its contrast to the rest of Madeira — fewer greens, more volcanic tones, and uninterrupted coastal views.
Getting There, Parking & Fees
The hike starts at Ponta de São Lourenço, at the eastern tip of the island. There’s a large parking area near the trailhead, but it fills up quickly, especially in the morning. Parking is paid, and it’s best to arrive early if you want to secure a spot without waiting.
If you don’t have a car, we’d recommend booking an organised transfer instead of relying on taxis. A round-trip hiking transfer via GetYourGuide drops you right at the trailhead and picks you up again after the hike, which makes logistics much easier.
There are basic facilities near the start, but nothing along the trail itself, so water and sun protection are essential. Given how exposed the hike is, we’d personally only attempt it on a calm, clear day, especially if hiking with kids or carrying a baby.
7. Vereda do Fanal (PR13)
Distance: 10.8 km
Duration: 4 hours
Difficulty: medium
Why This Hike Is Worth It
This is another hike we decided not to do, mainly because of the conditions on the day we visited. Fanal is known for being foggy, windy, and very humid, and with Ema still very small, it didn’t feel like the right moment for a longer hike here.
That said, even just exploring Fanal Forest by car and on short walks was enough for us to see how special this area is. The ancient laurel trees, open meadows, and shifting mist create a surreal atmosphere, and we can easily imagine how beautiful this trail must be on a clear, sunny day when the views open up.

Trail Overview: What to Expect
The trail runs through the heart of Fanal Forest, following gentle paths across grassy clearings and through clusters of old, twisted laurel trees. Unlike many hikes in Madeira, this one is less about dramatic cliffs and more about atmosphere and landscape.
From what we saw while walking around the area, the terrain looks fairly gentle, with gradual ups and downs rather than steep climbs. On clear days, the trail is said to offer wide views over the surrounding mountains and valleys, but even in fog, the forest itself feels like the main attraction.
Read our complete visitor guide to Fanal Forest — when to visit, what to expect, and how to explore the area by car and on foot.

Getting There, Parking & Fees
Fanal is easily accessible by car, and we drove through the area without any issues. There are several informal parking areas near the forest where visitors leave their cars — parking is free and generally straightforward.
There are no facilities along the trail, so it’s best to come prepared. If you catch Fanal on a clear day, this hike is likely to be a highlight, but we’d personally plan it with flexible timing and check the weather closely before committing.

8. Vereda dos Balcões (PR11)
Distance: 1.5 km one-way (3 km round trip)
Duration: 1.5 hours
Difficulty: easy
Why This Hike Is Worth It
For us, this hike was all about maximum reward for minimal effort. It’s one of those walks that works perfectly on a relaxed day or when you want something gentle but still scenic.
The trail is mostly flat and easy-going, which made it a nice option to combine with other activities. We loved that it felt calm and accessible while still leading to a viewpoint that genuinely surprised us at the end.

Trail Overview: What to Expect
We walked through forest almost the entire way, following a wide, well-maintained path that never once felt demanding for us. From the start, it felt more like a peaceful stroll in nature than a hike, and that was exactly what we were looking for that day.
We didn’t see many views along the way, but we honestly didn’t miss them — the walk itself was calm and enjoyable. We passed a simple hut with food and toilets along the way.
Then, right at the end, the trail suddenly opened up to a beautiful viewpoint over the mountains and valleys around us. For such a short and easy walk, that moment felt like a really satisfying payoff.
Read our Vereda dos Balcões full hiking guide.

Getting There, Parking & Fees
The hike starts along a road near Ribeiro Frio, where we found free parking directly along the roadside. There’s no official car park, but parking is easy. Even if it’s full it doesn’t take long for someone to leave.

9. Levada do Furado (PR10)
Distance: 11 km
Duration: 5 hours
Difficulty: easy / medium
Why This Hike Is Worth It
Even though we didn’t do the whole thing — the trail is officially marked as closed — the time we spent walking along Levada do Furado still showed us exactly why it’s considered one of Madeira’s classic levada routes.
That first stretch had everything we love about levada walking: lush forest, a steady ribbon of water beside our steps, and a feeling of being deep inside Madeira’s ancient natural world.
The levada carries water from high in the Laurissilva forest, so even a short section feels worth it and rich with greenery. We could easily see this being a peaceful all-day walk.

Trail Overview: What to Expect
We only walked a short section of this trail, but it instantly felt like a classic Madeira levada. The path runs gently alongside the water channel, mostly flat and easy, with dense forest all around us.
Everything felt very green and quiet, with the sound of flowing water following us the whole time. There were a few small openings in the trees where we could look down into the valley, but for the most part it was about the atmosphere rather than the views.
Getting There, Parking & Fees
We accessed this section from the same roadside parking area used for Vereda dos Balcões (PR11) near Ribeiro Frio, where there’s free roadside parking available right by the start of the levada network.
Since part of the route is officially closed, it’s worth checking conditions before committing to a longer walk.

10. Levada do Rei (PR18)
Distance: 5.3 km one-way (10.6 km round trip)
Duration: 3.5 hours
Difficulty: easy
Why This Hike Is Worth It
This hike is worth doing because it’s a long, calm levada walk that stays enjoyable from start to almost finish. We loved how steady and green it felt the entire way, with the levada guiding us deeper into the forest without any rush or big climbs.
We loved the occassional viewpoints over the valley. One of the highlights comes near the end, where water starts dripping down over the trail and you walk through it, adding a fun, unexpected moment to an already lovely walk.

Trail Overview: What to Expect
From the start, we followed the levada through dense forest on a mostly flat, easy path that never felt demanding. The walk felt calm and unrushed, with the sound of flowing water beside us almost the entire time. It was wet & muddy, so proper shoes are essential.
As we went deeper, the trail became wetter and more enclosed, with tunnels and sections where water drips down from the rock above. One of the standout moments comes near the end, where water actually falls directly over the trail, and you walk straight through it — fun if you’re prepared, but impossible to avoid getting wet.
We turned back just before the wettest section to avoid soaking Ema, but the path continues a bit further to the final waterfall and pool. A rain jacket really makes a difference here, even on an otherwise dry day.
Read our full Levada do Rei hiking guide.

Getting There, Parking & Fees
The hike starts in São Jorge, in the north of Madeira. Parking near the trailhead is free.
If you don’t have a car, we’d strongly recommend booking an organised hiking transfer via GetYourGuide, which drops you right at the start and picks you up again after the hike.

Where to stay
Where you stay in Madeira can make a big difference, especially if hiking is your main focus. Having the right base helps with early starts, changing weather, and reaching trailheads across the island without stress.
We’ve covered this in much more detail in our full guide on where to stay in Madeira, where we break down the best areas and hand-picked hotels for different travel styles.
⭐️⭐️⭐️ Hotel Porto Mare – PortoBay (our top pick) – This is one of our favourite places we stayed at in Madeira, especially if you want comfort after long hiking days. Porto Mare feels like a tropical oasis — lush gardens everywhere, several pools, ocean views, and a calm, relaxed vibe that instantly helps you switch off.
We loved coming back here after hikes to unwind, wander through the gardens, or relax by the pool. One thing that really stood out for us was the themed dinners each evening — every night felt different, which made staying in for dinner actually exciting. It’s not a small hotel, but as a recovery base after Madeira’s demanding hikes, it worked perfectly.
⭐️ Best for: Comfort, relaxation, and unwinding after big hiking days
👉 Check current deals →

⭐️⭐️ Aqua Natura Bay – Aqua Natura Bay has a completely different feel — smaller, boutique, and much more intimate. We stayed here and loved how calm and cozy it felt, especially compared to larger resorts.
The rooms are lovely, but the real highlight is the rooftop infinity pool with sweeping ocean and mountain views — easily one of the most relaxing spots we experienced on the island. The food selection isn’t huge, but everything we ate was genuinely tasty, which we honestly appreciated more than a big, generic menu.
⭐️ Best for: Boutique stays, views, and a quiet hiking base
👉 Compare prices →

⭐️ Quinta das Vinhas – Quinta das Vinhas is a peaceful countryside stay surrounded by vineyards, with a slower, more rural feel. It’s the kind of place you choose if you want silence, space, and scenery rather than resort-style amenities.
The setting is beautiful and feels very “Madeira,” especially in the mornings and evenings. It works best if you have a car, as it’s more secluded, but that’s also part of its charm. After long hikes, this is the type of place where you eat well, sleep deeply, and fully reset.
⭐️ Best for: Quiet countryside vibes and total switch-off
👉 See latest prices →
How to get around Madeira
If you’re planning to hike in Madeira, getting around efficiently really matters. Many of the best levadas, viewpoints, and trailheads are spread across the island — and public transport won’t get you everywhere you want to go.
Renting a Car (What We Did — and Recommend)
We rented a car in Madeira and would 100% do it again. It gave us total freedom to start hikes early, chase good weather, and reach trailheads that are impossible to access otherwise.
Madeira’s roads can be steep, narrow, and winding, especially in the mountains — but that’s part of the adventure. If you’re comfortable driving in hilly terrain, it’s actually fun and incredibly rewarding.

We always book through DiscoverCars — not just in Madeira, but everywhere we travel. It consistently gives us the best balance of price, clear conditions, and reliable rental companies.
👉 The key thing: we always add their full coverage insurance. It’s much cheaper than what rental desks offer on arrival, and it gives real peace of mind on Madeira’s roads — especially with tight parking spots and mountain driving.
If you want all the details, we’ve broken everything down in our full guide on renting a car in Madeira (costs, road conditions, parking tips, and common mistakes to avoid).
👉 Check car rental prices with full coverage →

Taxis & Transfers
Taxis work fine for short city rides in Funchal, but they quickly become expensive and impractical once you start chasing trailheads around the island.
If you want stress-free logistics on hiking days without a rental car, booking a transfer in advance is a smart choice. These options take you straight to the trail start and pick you up again at the end, so you can focus on the walk — not logistics.
Here are some excellent transfers tailored to Madeira’s most scenic hikes:
- Pico do Arieiro Sunrise Hike
- Rabaçal – 25 Fontes & Risco Levada
- Levada do Moinho
- Ponta de São Lourenço (PR8)
- Levada do Rei (PR18)

Best time to visit
Madeira is great for hiking year-round, but some seasons clearly work better than others.
We planned our trip for late May to early June and were genuinely surprised by how many flowers were in bloom, paired with near-perfect hiking weather throughout our stay. Even better, the crowds were still very manageable.
- Spring (April–June): The best overall period. Mild temperatures, green landscapes, and wildflowers in bloom. Hydrangeas peak from late May to early June, especially along levadas.
- Summer (July–September): Most stable weather, but hotter and busier. Early starts are key for exposed hikes.
- Autumn (October–November): Quieter, still warm, and pleasant for hiking, though clouds are more common in the mountains.
- Winter (December–March): Fewer crowds and lower prices, but mountain weather is unpredictable; levadas are the safer choice.
Our pick: April–June for scenery and comfort, or September–October for fewer crowds and solid hiking conditions.
Read Best time to visit Madeira for a more detailed overview.

Quick Tips & Local Insights
- Start early for popular hikes like Pico do Arieiro — it makes a huge difference for crowds and clouds.
- Weather changes fast, especially in the mountains; always check forecasts for both north and south coasts.
- A car saves time and lets you chase better conditions if one side of the island is cloudy.
- Levada tunnels can be wet and dark — a headlamp and proper shoes are worth it.
- Clouds don’t mean rain in Madeira; often you’ll hike above them.
- Parking is limited at many trailheads, so arriving early helps avoid stress.
- Hydrangeas look best from late May to early June, especially along levadas and mountain roads.

Final Thoughts
Hiking in Madeira is incredibly rewarding, but it’s also a place where conditions, timing, and expectations really matter. The same trail can feel completely different depending on wind, clouds, crowds, or even the time of day you start. We learned that quickly, especially travelling with a baby, and it shaped how we approached each hike.
What stood out to us most is the variety. In a single trip, we walked along narrow levadas carved into cliffs, wandered through misty laurel forests, explored wild coastal paths, and stood high above the clouds on exposed ridges.
If there’s one takeaway, it’s this: be flexible. Check the weather, start earlier or later to avoid crowds, and don’t be afraid to turn around if conditions don’t feel right.